Create New Firebase Account #
STEP 1.1: Go to Firebase Official website (firebase.google.com) & Click on “Sign in” to create a new google account OR choose an already created account.

STEP 1.2: Go to Firebase Official website . Click on “Go to Console” to navigate to All Projects page.

STEP 1.3: Click on “Create a project” to create a new firebase project.
PLEASE NOTE : Multiple Firebase projects can be created under a single Firebase Account. Multiple Apps (Android, iOS, Web) can be added to a single Firebase Project. All apps within the same Firebase account will share same: Firestore database, Cloud functions, Indexes etc. It is advised to add multiple apps to a Firebase Project very carefully

STEP 1.4:
A) Set your desired Project Name, Example- TestApp
B) Set your unique Project ID, Example- testapp-44 (This cannot be changed later)

STEP 1.5: Select Analytics Location country from where most of your app users are from. Click “Create Project” to create a new project finally.

STEP 1.6: On the project is successfully created, Click on “Continue” to navigate to Firebase Dashboard or to see All the projects created in this account.

STEP 1.7: Go to Firebase Console & select a project to see the Dashboard. You must set some basic project settings to get started as described in the next step.

STEP 1.8: Click the “General” tab in Project Settings Page
A) Edit “Project name” if needed.
B) Project ID which is set while creating the Firebase account.
C) Choose “Default GCP location” (Region where your Firebase data will be stored in Google Data Center. Choose the one nearest to your maximum of app users). Recommended- eur3(europe-west) OR nam5 (us-central) which are multi-region server locations that will serve users around the world. And most of the Firebase services are available at these locations.
D) Set Environment Type as “Production” once you launch the apps & is LIVE to users. This is just a Label.
E) Set “Public facing name” for Project that will be visible to app users.
F) Choose “Support Email” (You must select this otherwise , firebase project will not be ready to use)
G) Always check from the dropdown if you are in the correct Firebase project.

👏 Congratulations ! You have successfully created a new Firebase account and completed basic setup. Now , you can proceed setting up each section like, Firebase Billing, Authentication, Firestore, Storage ,Functions, etc.
Setup Firebase billing (BLAZE PLAN) #
STEP 2.1: Open Firebase Console , Select a Project to open Firebase Dashboard.
To use complete services like- Firebase Cloud Functions to trigger push notifications etc, & to remove all limits. You must “Upgrade” the default “SPARK PLAN” (Free Plan) to “BLAZE PLAN” (Monthly Billed Paid Plan). However, Google will only Bill you monthly after your free quota gets exhausted depending upon the usage. You can also set Billing Alerts when it crosses your mentioned amount every month. You may refer Firebase official pricing page to compare both plans.
Click on “Upgrade” to setup billing.

STEP 2.2: Click on “Select Plan” to choose BLAZE PLAN.

STEP 2.3: Click “Continue” to confirm that you would like to proceed with Blaze Plan.

STEP 2.4: Every Firebase Account is by default a Google Cloud Platform (GCP)Account as both are Google products. Billing will be done through GCP. You need to set up a GCP Billing account. Select the country, to which you as an Individual/Organization belong.

STEP 2.5: Setup your Billing profile
A) Select Billing Account (Default- Firebase Payment)
B) Select the country, to which you as an Individual/Organization belong.
C) Select the currency in which you will pay to Google.

STEP 2.6: Fill the complete information correctly.
A) Select Account Type
B) Select the Business name exactly as in Documents Proof. (if business selected above)
C) Enter the Card Number of your Credit Card. (Any card from which Google can automatically charge you the monthly Bill)
D) Country Wise restriction message for card usage (if any, click on “Learn more” to see more info))
E) Enter your/business Tax Information.
Click on “Confirm Purchase” once you fill all required info.

STEP 2.7 (Optional): For Some countries, Google might have verification procedures for Credit Cards/Individuals/Businesses. If you see any verification screen, you should go through that screen and complete all the tasks instructed there. Sometimes it takes a few days to get the billing account reviewed by Google OR it might be approved instantly. You will see the Final confirmation message like – “Successfully upgraded to Blaze Plan”.
STEP 2.8: Your Firebase Plan must have been upgraded to BLAZE PLAN. It should be shown at the bottom left. If not, then just once again click the “Upgrade” button & simply select the Blaze Plan.

👏 Congratulations ! You have successfully upgraded to BLAZE PLAN. Now you are ready to use all Firebase Services within your project.
Setup Firebase Authentication #
STEP 3.1: Open Firebase Console , Select a Project to open Firebase Dashboard.
Enable your Required List of Sign-in Providers.
For Users/Admin to be able to login to the Apps, you need to set up the Sign-in methods which are also called SignIn Providers.
From the Left expanded Menu, select “Authentication” > “Sign-in method”.

Setup Cloud Firestore (Database) #
STEP 3.1: Open Firebase Console , Select a Project to open Firebase Dashboard.
From the Left expanded Menu, select “Firestore Database” > “Create Database”.
All Text string data are stored in this Firestore Cloud Database. (Media Files, Documents are not stored here, they are stored in Firebase Storage)

STEP 3.2: Choose > “Start in production mode“, as we have the security rules available.

STEP 3.3: For confirmation, the Cloud Firestore data will store at the selected Data Center. Click on “Enable” to create empty database.
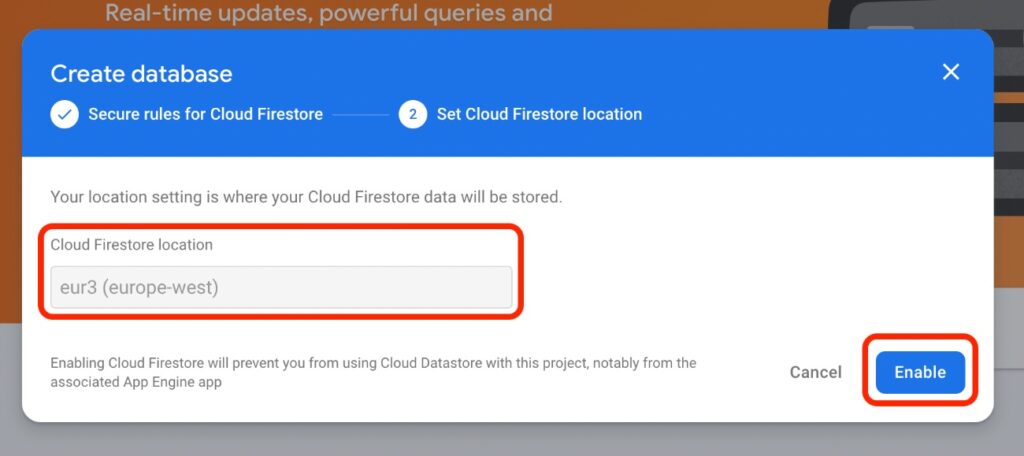
An empty database is created for your Firebase project.

👏 Congratulations! Your project database is ready to store all string Data.
Firebase Storage (Media Files) #
STEP 4.1: Open Firebase Console , Select a Project to open Firebase Dashboard.
From the Left expanded Menu, select “Storage”
Only Media files are stored in this Firebase Storage.
By default , you will have an empty file storage area with no files or folders.
👏 👏 👏 Congratulations! Firebase Project setup has been completed. You can now add Android, iOS, Web apps to your Firebase project.