Firebase has a Website Hosting Service known as Firebase Hosting. You can host your web app with firebase domain extension such as (yourappname.web.app). The domain name (yourappname.web.app) depends upon the availability which we will check in the next step.
PREREQUISITES: You must have enabled Firebase Blaze Plan – pay as you go.
STEP 1: Install the Firebase CLI on your Computer (If you have already installed it, you can skip this step)
STEP 2: Drag & Drop your Project folder (fiberchat_web) into VS Code Terminal / Open Project folder as the root folder in any terminal.
STEP 3: Run the Command & dialog prompt will be shown to sign in to your Firebase Google Account.
Once successfully logged in, you will see a message “Logged in as xxxx@xxxxx.xx“
firebase loginSTEP 4: Before moving to the next step, kindly make sure you already have Built Web App so that it is ready to publish/host.
STEP 5: Check if you have pasted your firebase project id correctly in – fiberchat_web/.firebaserc file.
STEP 6: Initialize Firebase – In the same terminal, run the following command:
firebase init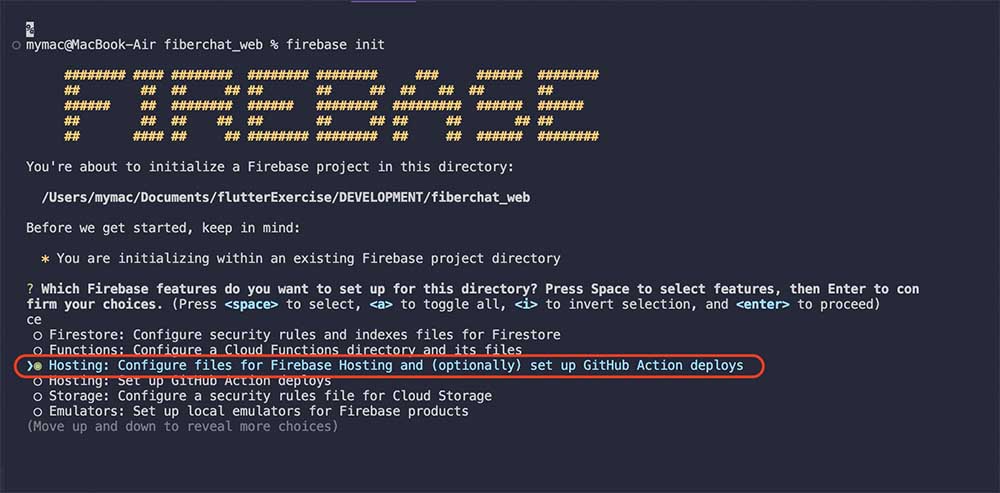
Select “Hosting : ………..” using keyboard arrow keys and space bar and hit enter & answer the below question as shown below:
What do you want to use as your public directory? build/web

Configure as a single-page app (rewrite all urls to /index.html)? No

Set up automatic builds and deploys with GitHub? No

✔  Wrote build/web/404.html
? File build/web/index.html already exists. Overwrite? No
Once successfully done, you will see the following messages:
i  Skipping write of build/web/index.html

i  Writing configuration info to firebase.json...
i  Writing project information to .firebaserc...

✔  Firebase initialization complete!
STEP 7: Deploy to Firebase Hosting – In the same terminal, run the following command:
firebase deploy --only hostingOnce successfully deployed, you will see the following messages:
i  deploying hosting
i  hosting[your-project-id]: beginning deploy...
i  hosting[your-project-id]: found 328 files in build/web
✔  hosting[your-project-id]: file upload complete
i  hosting[your-project-id]: finalizing version...
✔  hosting[your-project-id]: version finalized
i  hosting[your-project-id]: releasing new version...
✔  hosting[your-project-id]: release complete

✔  Deploy complete!


Project Console: https://console.firebase.google.com/project/your-project-id/overview
Hosting URL: https://your-project-id.web.app
👏 Congratulations ! Your Web App is hosted on Firebase Hosting & is now live with the URL: https://your-project-id.web.app
If you wish to replace this URL with your own domain name, you can refer: Connect Firebase Web App with Custom Domain
OPTIONAL: If you wish to set any other SITE NAME in your firebase URL. (Example: https://{your-firebase-site-name}.web.app)
Paste the {your-firebase-site-name} in the file – fiberchat_web/firebase.json as shown below. This site should also be registered in ::: Firebase Dashboard > Firebase Hosting > “Add another site“. Now, Repeat Step 7 to deploy the webapp to https://{your-firebase-site-name}.web.app.
{
  "functions": {
    "source": "functions"
  },
  "hosting": {
    "site":"your-firebase-site-name",
    "public": "build/web",
    "ignore": [
      "firebase.json",
      "**/.*",
      "**/node_modules/**"
    ]
  }
}