Custom Authentication flow works with the help of Lambda Triggers which act as handlers for different events during Users Sign in process.
Refer to the Steps below to setup & configure Lambda Triggers.
STEP 1: #
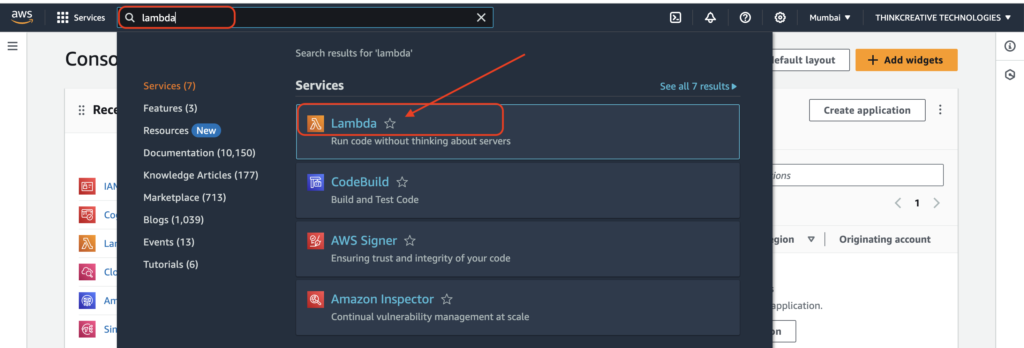
- Sign in to the AWS Console, Navigate/Search for Lambda, and Click on “Lambda“.
STEP 2: #
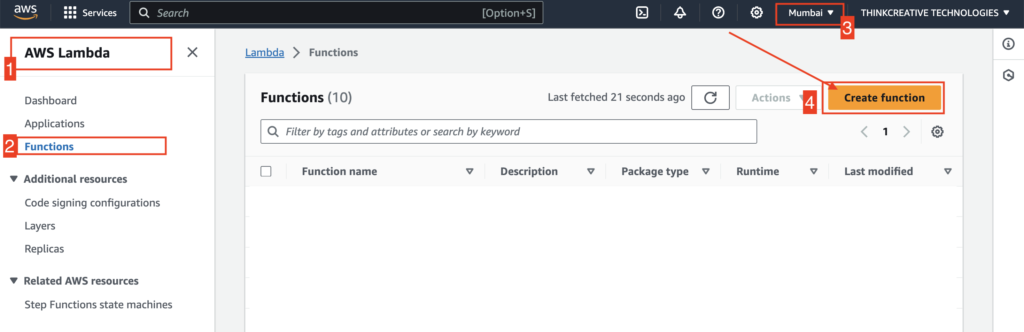
- Open AWS Lambda console
- Click on Functions tab
- Make sure the correct Region is selected at the top right corner.
- Click on Create Function to create the following 4 functions one after another:
autoConfimUserFN, defineAuthChallengeFN, createAuthChallengeFN, verifyAuthChallengeFN
Please refer to the next steps to start creating.
STEP 3: [NOT CORRECT] #
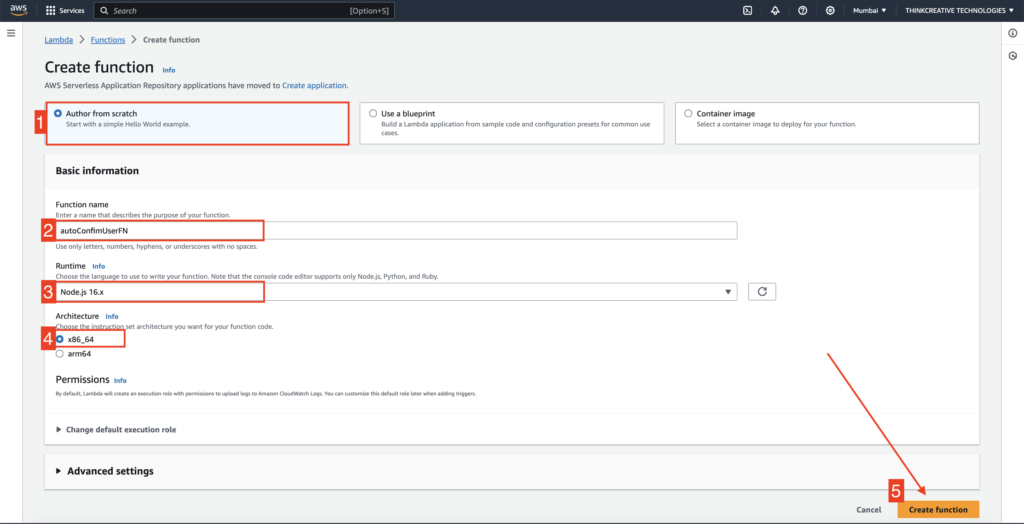
Create function: autoConfirmUserFN
- Select “Author from Scratch“
- Set the function name as “autoConfirmUserFN“
- Select “Node.js 16.x” as Runtime. Nodeeeeeeee VErsssionn 18.x also rename inex.mjs to index.js
- Select Architecture “x86_64“
- Click on “Create function” and refer to the next step
Paste the following code as shown below:
exports.handler = async function (event) {
event.response.autoConfirmUser = true;
// Set the SMS as verified if it is in the request
if (event.request.userAttributes.hasOwnProperty('phone_number')) {
        if(event.request.userAttributes.PhoneNumber===''){
    }else{
event.response.autoVerifyPhone = true;
event.response.autoVerifyEmail = false;
    }

}
// Set the email as verified if it is in the request
if (event.request.userAttributes.hasOwnProperty('email')) {
    if(event.request.userAttributes.email===''){
    }else{
     event.response.autoVerifyEmail = true;
event.response.autoVerifyPhone = false;
    }

}
return event;
};

Click on “Deploy” to complete function creation.
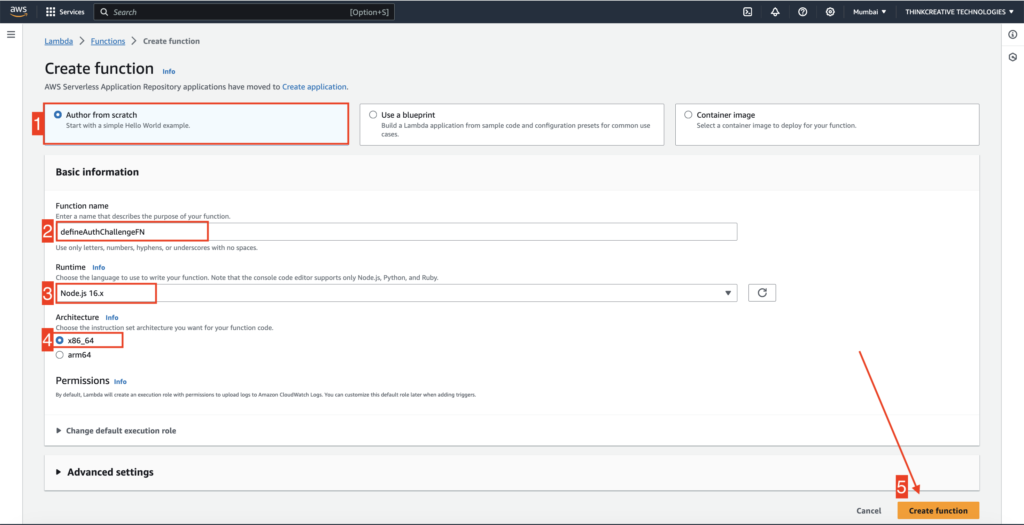
STEP 4: #
Create function: defineAuthChallengeJS
- Select “Author from Scratch“
- Set the function name as “defineAuthChallengeJS“
- Select “Node.js 16.x” as Runtime
- Select Architecture “x86_64“
- Click on “Create function” and refer to the next step
Paste the following code as shown below:
exports.handler = async function (event) {
'use strict';

exports.handler = async (event) => {
    console.log('RECEIVED------  event: ', JSON.stringify(event, null, 2));

    // The first auth request for CUSTOM_CHALLENGE from the AWSMobileClient (in iOS native app) actually comes in as an "SRP_A" challenge (BUG in AWS iOS SDK), so swicth to CUSTOM_CHALLENGE and clear session.
    if (event.request.session && event.request.session.length && event.request.session.slice(-1)[0].challengeName == "SRP_A") {
        console.log('New CUSTOM_CHALLENGE', JSON.stringify(event, null, 2));
        event.request.session = [];
        event.response.issueTokens = false;
        event.response.failAuthentication = false;
        event.response.challengeName = 'CUSTOM_CHALLENGE';
    }
    // User successfully answered the challenge, succeed with auth and issue OpenID tokens
    else if (event.request.session &&
        event.request.session.length &&
        event.request.session.slice(-1)[0].challengeName === 'CUSTOM_CHALLENGE' &&
        event.request.session.slice(-1)[0].challengeResult === true) {

        console.log('The user provided the right answer to the challenge; succeed auth');
        event.response.issueTokens = true;
        event.response.failAuthentication = false;
    }
    // After 3 failed challenge responses from user, fail authentication
    else if (event.request.session &&
    // event.request.session.length >= 1 &&
    event.request.session.slice(-1)[0].challengeResult === false) {
        console.log('FAILED Authentication: The user provided a wrong answer 3 times');
        event.response.issueTokens = false;
        event.response.failAuthentication = true;
    }
    // The user did not provide a correct answer yet; present CUSTOM_CHALLENGE again
    else {
        console.log('User response incorrect: Attempt [' + event.request.session.length + ']');
        event.response.issueTokens = false;
        event.response.failAuthentication = false;
        event.response.challengeName = 'CUSTOM_CHALLENGE';
    }

    console.log('RETURNED event: ', JSON.stringify(event, null, 2));

    return event;
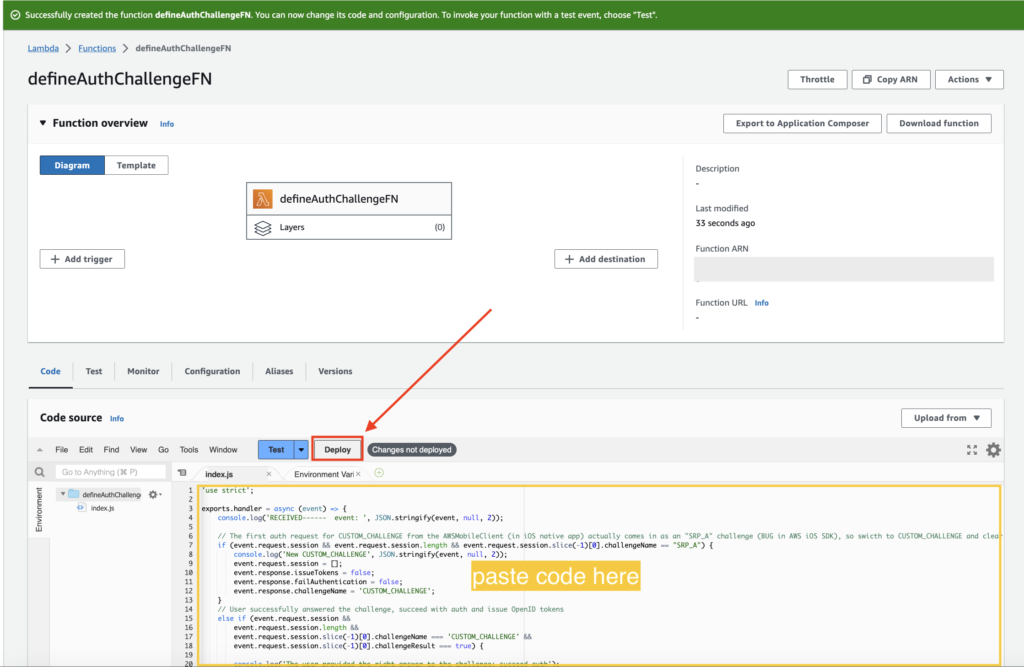
Click on “Deploy” to complete function creation.
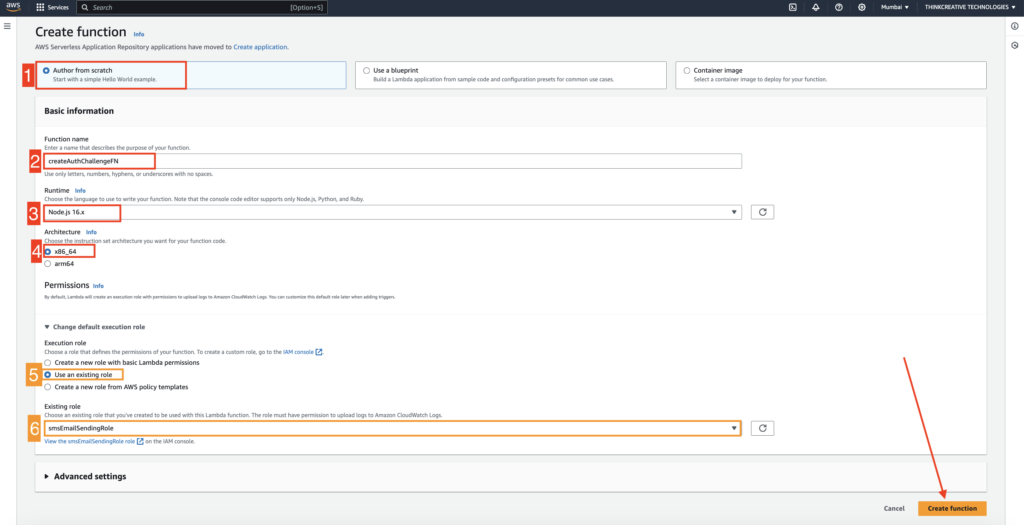
STEP 5: #
Create function: createAuthChallengeFN
- Select “Author from Scratch“
- Set the function name as “createAuthChallengeFN“
- Select “Node.js 16.x” as Runtime
- Select Architecture “x86_64“
- Select “Use an existing role” under Execution role {IMPORTANT}
- Choose previously created “smsEmailSendingRole” as the IAM role created using this GUIDE {IMPORTANT}
- Click on “Create function” and refer to the next step
Paste the following code as shown below:
const AWS = require("aws-sdk");

 var sns = new AWS.SNS();

 function splitStr(str) {
    // Function to split string
    let string = str.split("-|-");
    return string;
}

function generateRandomNumber() {
//  var minm = 1000;  four digit otp
// var maxm = 9999;
    var minm = 100000;
    var maxm = 999999;
    return Math.floor(Math.random() * (maxm - minm + 1)) + minm;
}

  // Send secret code over SMS via Amazon Simple Notification Service (SNS)
 async function sendSMSviaSNS(phoneNumber, secretLoginCode, subject, bodyString, footerString1, fromEmail, companyLogoURL, appName,footerString2, bodyHeading) {
 var mssg= `${appName} ${bodyHeading} : ${secretLoginCode}\n\n\n${footerString1}`  ;
 const params = { "Message": mssg, "PhoneNumber": phoneNumber };
     const response =await sns.publish(params).promise();
 return response;
 }


   // Send secret code over Email via Amazon SES
  async function sendSMSviaSES(email, secretLoginCode, subject, bodyString, footerString1, fromEmail, companyLogoURL, appName,footerString2, bodyHeading) {
 const client = new AWS.SES();
var htmlString = `
<!DOCTYPE html PUBLIC "-//W3C//DTD XHTML 1.0 Strict//EN" "http://www.w3.org/TR/xhtml1/DTD/xhtml1-strict.dtd">
<html xmlns="http://www.w3.org/1999/xhtml">
<head>
  <meta http-equiv="Content-Type" content="text/html; charset=utf-8">
  <meta name="viewport" content="width=device-width, initial-scale=1.0">
  <title></title>
  <!--[if mso]><style type="text/css">body, table, td, a { font-family: Arial, Helvetica, sans-serif !important; }</style><![endif]-->
</head>

<body style="font-family: Helvetica, Arial, sans-serif; margin: 0px; padding: 0px; background-color: #ffffff;">
  <table role="presentation"
    style="width: 100%; border-collapse: collapse; border: 0px; border-spacing: 0px; font-family: Arial, Helvetica, sans-serif; background-color: rgb(239, 239, 239);">
    <tbody>
      <tr>
        <td align="center" style="padding: 1rem 2rem; vertical-align: top; width: 100%;">
          <table role="presentation" style="max-width: 600px; border-collapse: collapse; border: 0px; border-spacing: 0px; text-align: left;">
            <tbody>
              <tr>
                <td style="padding: 40px 0px 0px;">
                  <div style="text-align: left;">
                    <div style="padding-bottom: 20px;"><img src="${companyLogoURL}" alt="${appName}" style="width: 56px;"></div>
                  </div>
                  <div style="padding: 20px; background-color: rgb(255, 255, 255);">
                    <div style="color: rgb(0, 0, 0); text-align: left;">
                      <h1 style="margin: 1rem 0">${bodyHeading}</h1>
                      <p style="padding-bottom: 16px">${bodyString}</p>
                      <p style="padding-bottom: 16px"><strong style="font-size: 190%; color:SlateBlue;">${secretLoginCode}</strong></p>
                      <p style="padding-bottom: 12px;font-size: 80%;">${footerString1}</p>

                    </div>
                  </div>
                  <div style="padding-top: 20px; color: rgb(153, 153, 153); text-align: center;">
                    <p style="padding-bottom: 16px">${footerString2}</p>
                  </div>
                </td>
              </tr>
            </tbody>
          </table>
        </td>
      </tr>
    </tbody>
  </table>
</body>
</html>
`;

    const body =  `${bodyString} ${secretLoginCode}`  ;
    const message = {
        "Subject": {"Data": subject},
        "Body": {"Html": {"Data": htmlString}}
    };
    const response = await client.sendEmail({
        Source: `${appName} <${fromEmail}>`  ,
        Destination: {"ToAddresses": [email]},
        Message: message
    }).promise();

    return response;

 }


 // Main handler
exports.handler = async function (event) {

 let secretLoginCode;

if (event.request.challengeName === 'CUSTOM_CHALLENGE' &&  event.request.session.length <2) {

 var phoneNumber = event.request.userAttributes.phone_number;
  var email = event.request.userAttributes.email;
    var metaData = splitStr(event.request.userAttributes.website);
   // var resData ='New CUSTOM_CHALLENGE'+ JSON.stringify(event.response, null, 2);
   // console.log(resData);
if (event.request.userAttributes.hasOwnProperty('phone_number')) {
   // Phone Number verify
     //--------  uncomment line below for test otp --------
//  secretLoginCode = "000000";

  //-------- uncomment line below for Real otp --------
   secretLoginCode = generateRandomNumber();
  await sendSMSviaSNS(phoneNumber, secretLoginCode,metaData[0],metaData[1],metaData[2],metaData[3],metaData[4],metaData[5],metaData[6],metaData[7] ); // use SNS for sending SMS,

  }else if (event.request.userAttributes.hasOwnProperty('email')) {
   // Email Verify
        //--------  uncomment line below for test otp --------
//  secretLoginCode = "111111";

  //-------- uncomment line below for Real otp --------
   secretLoginCode = generateRandomNumber();
  await sendSMSviaSES(email, secretLoginCode,metaData[0],metaData[1],metaData[2],metaData[3],metaData[4],metaData[5],metaData[6],metaData[7] ); // use SNS for sending SMS,

  }else{
   // ignore
  }

 event.response.privateChallengeParameters = {};
 event.response.privateChallengeParameters.answer = secretLoginCode;

 }
 else {
 //  const expectedAnswer = event.request.privateChallengeParameters.answer;
 // if (event.request.challengeAnswer == expectedAnswer) {
 const previousChallenge = event.request.session.slice(-1)[0];
 // secretLoginCode = previousChallenge.challengeMetadata.match(/CODE-(\d*)/)[1];
  event.response.privateChallengeParameters = {};
    event.response.privateChallengeParameters.answer = secretLoginCode;
    // event.response.publicChallengeParameters = {
    //   // hint: 'Enter the secret code',
    //   phone: event.request.userAttributes.phone_number
    // };
 }

event.response.challengeMetadata = `CODE-${secretLoginCode}` ;

 return event;
};
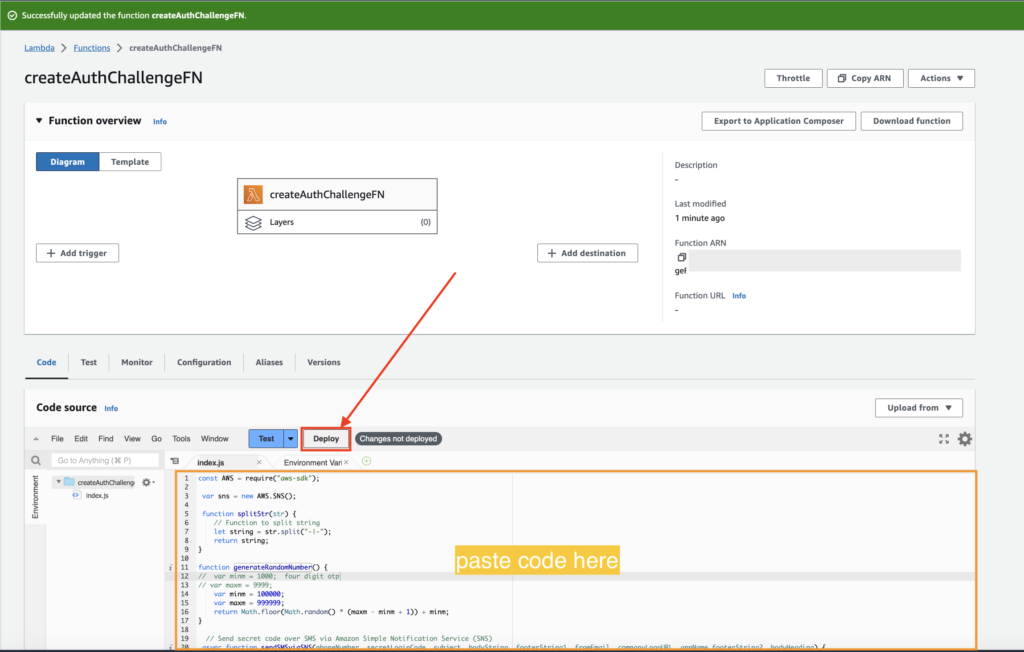
Click on “Deploy” to complete function creation.
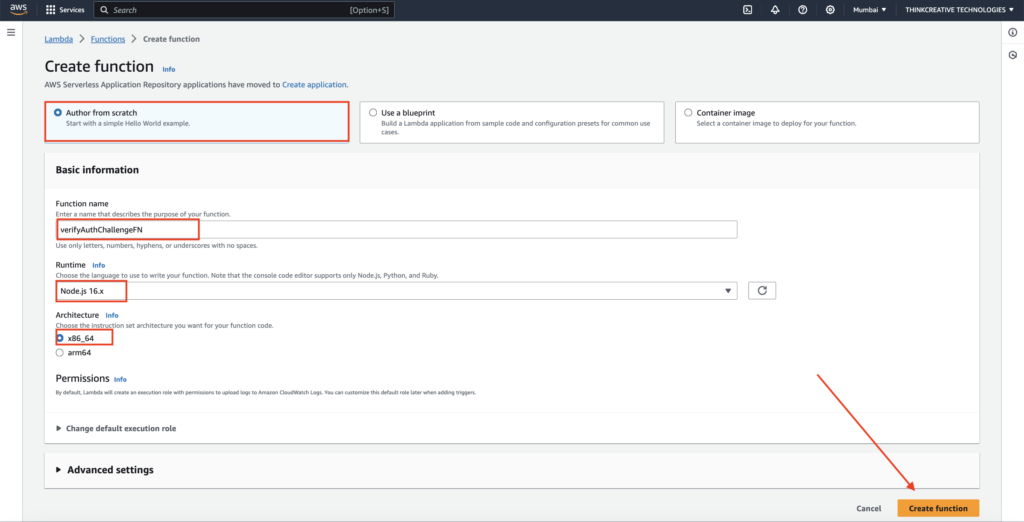
STEP 6: #
Create function: verifyAuthChallengeFN
- Select “Author from Scratch“
- Set the function name as “verifyAuthChallengeFN“
- Select “Node.js 16.x” as Runtime
- Select Architecture “x86_64“
- Click on “Create function” and refer to the next step
Paste the following code as shown below:
exports.handler = async function (event) {
const expectedAnswer = event.request.privateChallengeParameters.answer;
 if (event.request.challengeAnswer == expectedAnswer) {
 event.response.answerCorrect = true;
 }
 else {
 event.response.answerCorrect = false;
 }
 return event;
};

Click on “Deploy” to complete function creation.
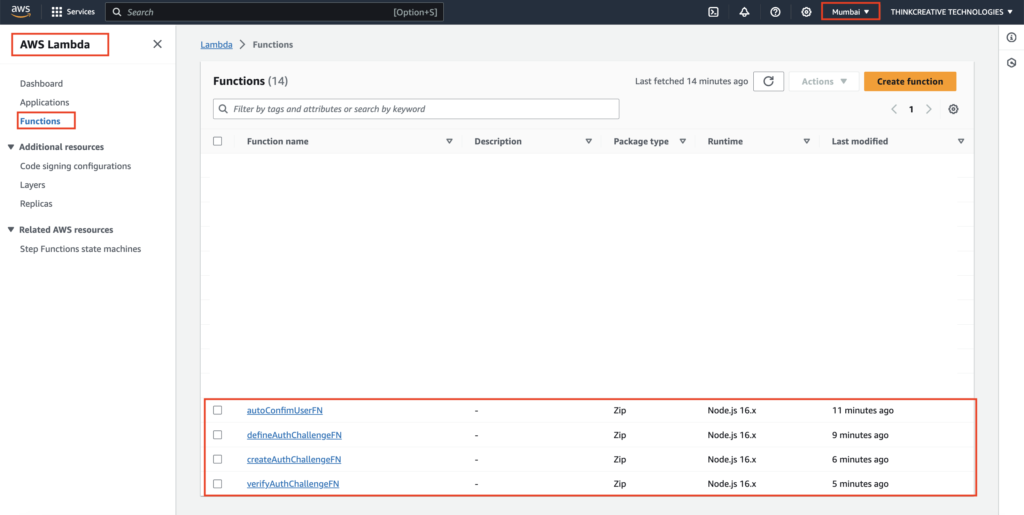
STEP 7: #
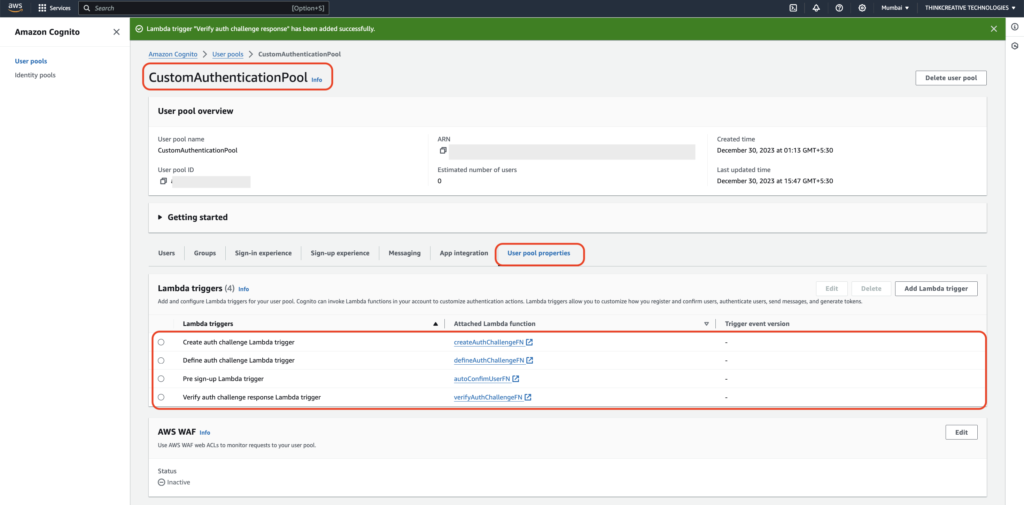
All our 4 newly created Lambda Functions can be seen here:
STEP 8: [NOT CORRECT] from here… #
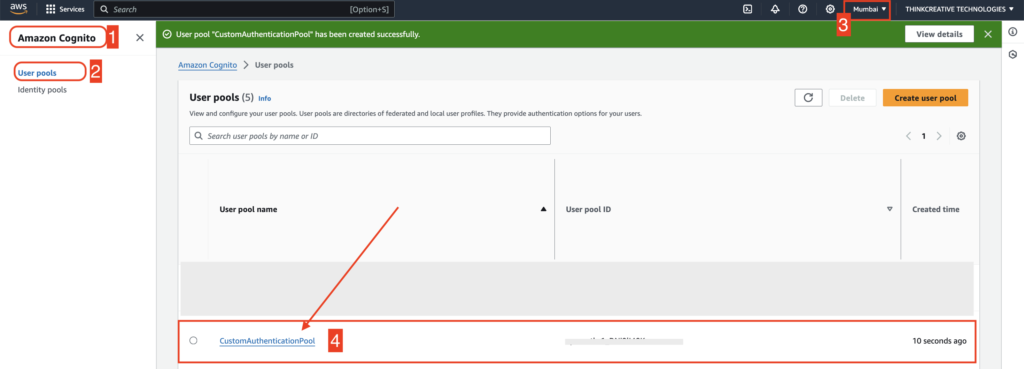
Link Lambda Triggers with the Custom Authentication Pool
Navigate to AWS Console –> Amazon Cognito –> User pools –> “CustomAuthenticationPool“, click on it to view its details
STEP 9: #
- Click on “User pool properties” tab
- Click on “Add Lambda trigger” to add the 4 lambda functions created in previous steps (autoConfimUserFN, defineAuthChallengeFN, createAuthChallengeFN, verifyAuthChallengeFN)

STEP 10: #
Add autoConfimUserFN function as a Lambda trigger.
- Select “Sign-up” as Trigger type
- Select “Pre sign-up trigger” under Sign-up category
- Select “autoConfimUserFN ” from the function list
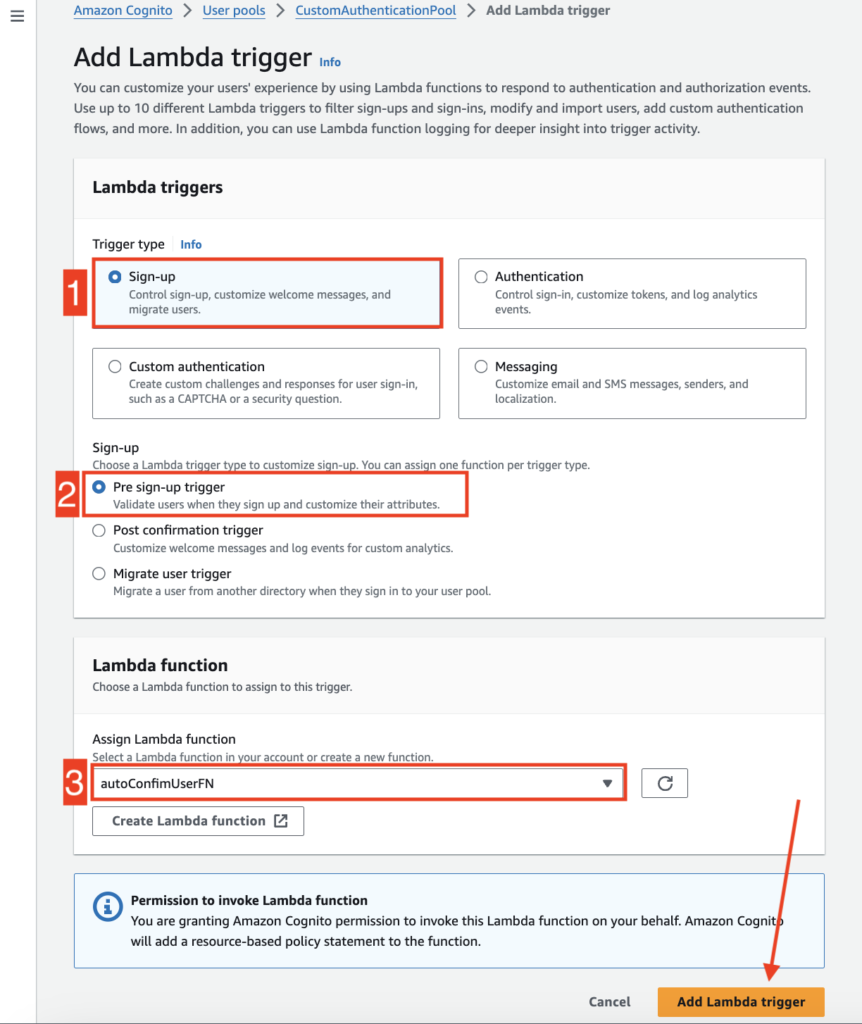
Click “Add Lambda trigger” to successfully add this function as lambda handler.
STEP 11: #
Add defineAuthChallengeFN function as a Lambda trigger.
- Select “Custom authentication” as Trigger type
- Select “Define auth challenge” under Custom authentication category
- Select “defineAuthChallengeFN” from the function list
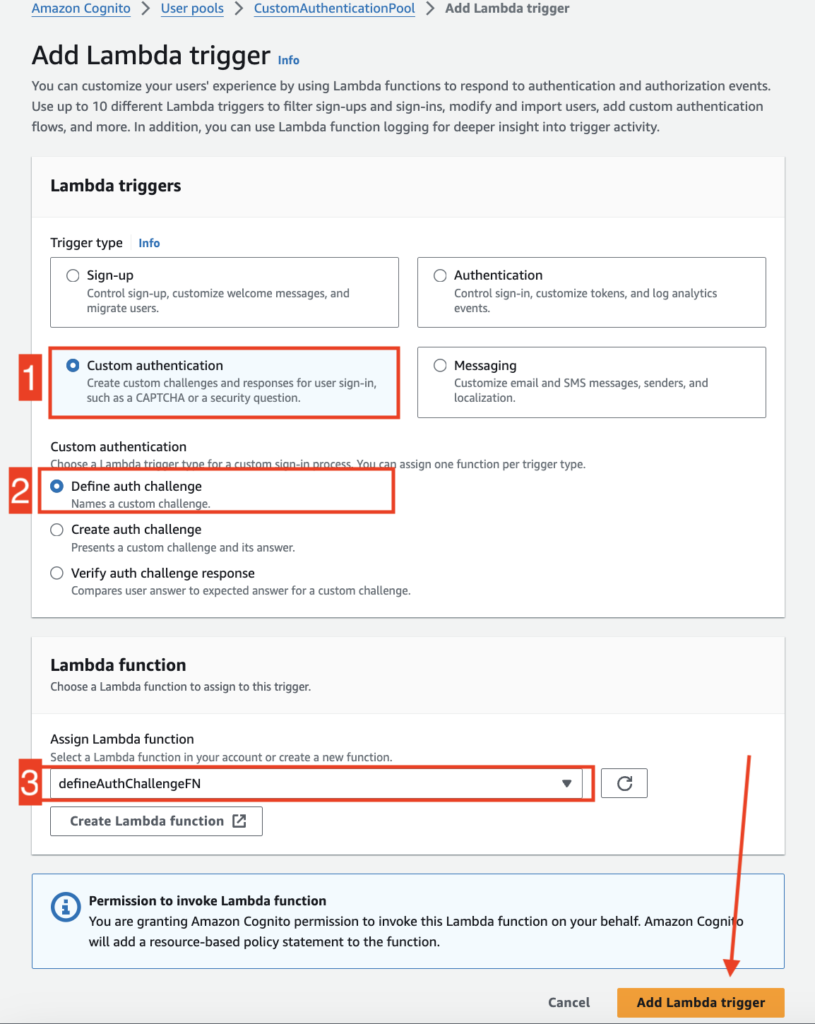
Click “Add Lambda trigger” to successfully add this function as a lambda handler.
STEP 12: #
Add createAuthChallengeFN function as a Lambda trigger.
- Select “Custom authentication” as Trigger type
- Select “Create auth challenge” under Custom authentication category
- Select “createAuthChallengeFN” from the function list
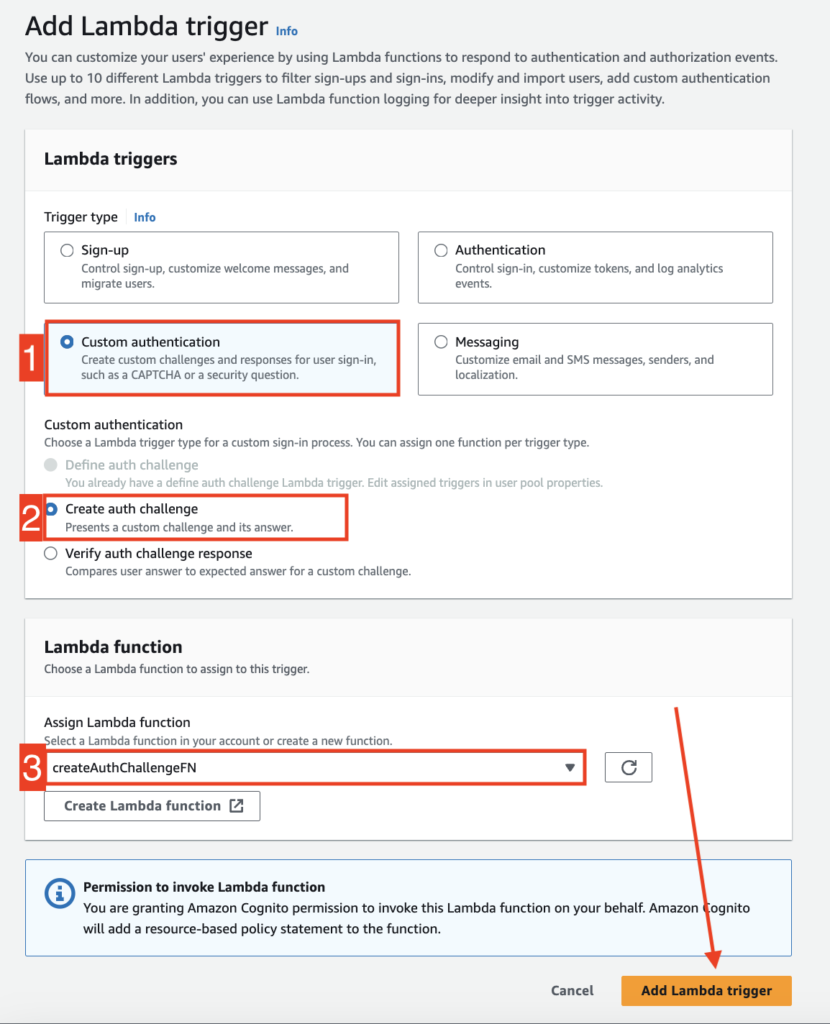
Click “Add Lambda trigger” to successfully add this function as a lambda handler.
STEP 13: #
Add verifyAuthChallengeFN function as a Lambda trigger.
- Select “Custom authentication” as Trigger type
- Select “Verify auth challenge response” under Custom authentication category
- Select “verifyAuthChallengeFN” from the function list
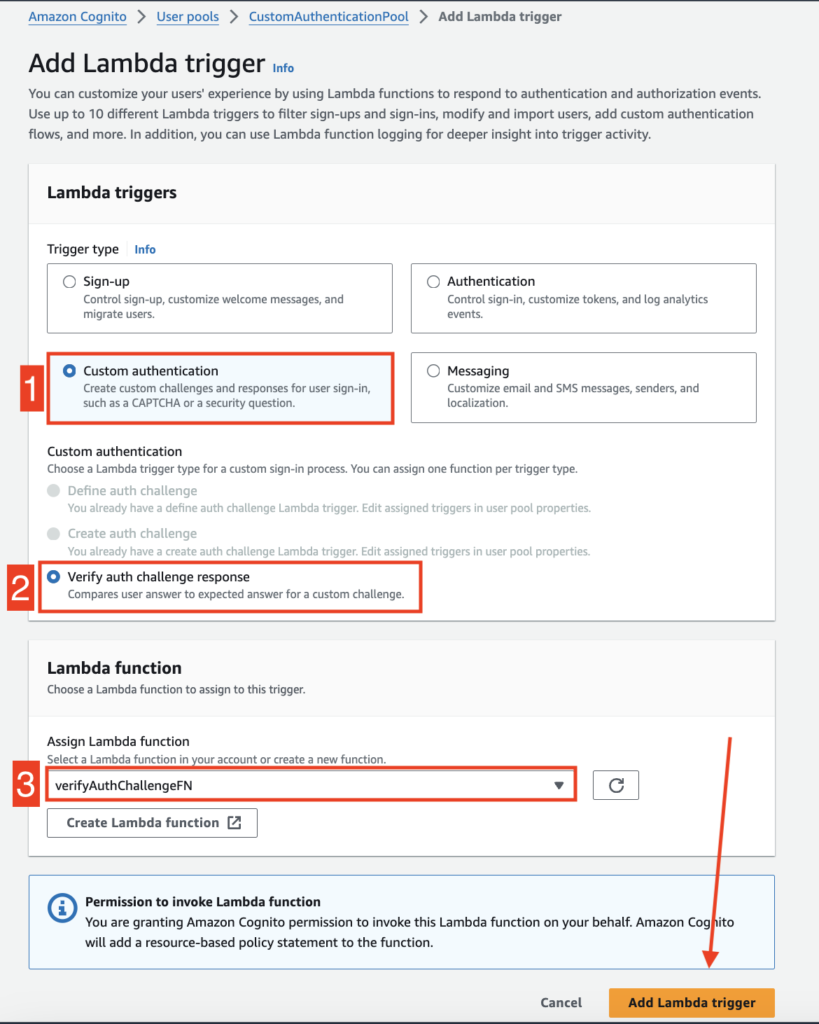
Click “Add Lambda trigger” to successfully add this function as lambda handler.
STEP 14: #
👏 Congratulations! We have successfully completed the Lamda trigger setup process.
All the created Lambda triggers can be seen here for the “CustomAuthenticationPool“.